Keyboard Modding Guide: Build Your Ultimate Keyboard

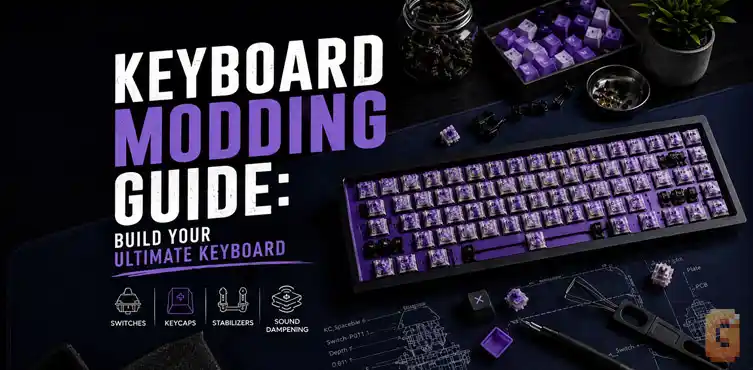
This comprehensive keyboard modding guide teaches you how to construct a premium, quiet, and deeply resonant 60% gasket-mounted keyboard from scratch using hot-swappable, south-facing components. You will discover exactly how to navigate confusing jargon, distinguish true gasket mounts from modified tray designs, and execute effective acoustic modifications.
The Ultimate Keyboard Modding Guide: Building Your Silent, Deep, Thocky 60% Gasket-Mount Keyboard
Walking into the custom mechanical keyboard hobby for the first time can feel like entering a foreign country without a map. You hear people talking about things like “tape mods,” “plate foams,” “south-facing LEDs,” and “PCBAs,” and you might feel completely lost.
If you are trying to build your very first keyboard, you probably want to make sure you get everything right on the first try. That is exactly why this keyboard modding guide exists. We are going to break down every single technical term, rank every major modification by its difficulty, and show you how to assemble a quiet, deep, and satisfyingly “thocky” compact keyboard.
When I first started customizing my own builds years ago, I fell into the same traps that many beginners face today. I spent money on parts that were incompatible, got confused by tricky marketing terms, and ended up with a board that rattled and pinged with every single keystroke.
By looking at the actual physics of keyboard acoustics and mounting styles, you can avoid these costly mistakes and build a board you will love using every single day. Let’s start by addressing the major hurdles you will encounter on this journey.
Identifying Three Main Issues
- When starting from absolute scratch, three major roadblocks stand in your way. First, the absolute mountain of technical jargon makes it difficult to know which materials you actually need to buy.
- Second, keyboard marketing can be deceptive, leading you to purchase a “tray-mount” keyboard when you actually wanted a “gasket-mount” typing experience.
- Third, achieving a quiet, deep, low-pitched “thocky” sound on a compact 60% layout requires a precise combination of components that are compatible with south-facing LEDs. This guide will directly solve all three of these problems for you.
What Do All These Keyboard Modding Terms Actually Mean?
Keyboard modding terms refer to the physical components, mounting styles, and acoustic treatments used to customize a mechanical keyboard’s sound and typing feel. Understanding these words is your first step toward making informed purchases and avoiding costly compatibility mistakes.
Let’s translate the most common jargon into simple, plain English so you know exactly what they do inside your keyboard.
PCBA (Printed Circuit Board Assembly)
The PCBA is the green, black, or blue fiberglass circuit board that acts as the electronic brain of your keyboard. It houses the microcontroller, the USB port, and the electrical traces that detect when you press a key.
In modern custom keyboards, you will usually find a hot-swappable PCBA. This means the board has pre-installed sockets on the back, allowing you to plug switches in and pull them out without ever needing a soldering iron.
Case Foam, Plate Foam, and PE Foam
Foams are the primary tools used to tune the acoustics of your keyboard. By filling empty spaces inside the chassis, different types of foam eliminate hollow echoes and shape the final pitch of your keystrokes.
Case foam sits at the very bottom of your keyboard case to absorb sound waves and stop them from bouncing off the bottom housing. Plate foam sits between the metal or plastic switch plate and the PCBA, dampening vibrations from the switches.
PE (polyethylene) foam is a thin, packaging-like sheet placed directly on top of the PCBA. When switches are pressed down through it, it produces a unique sound signature. Many custom keyboard enthusiasts desire this “poppy” or “marbly” acoustic profile.
The Tape Mod (Tempest Mod)
The tape mod is a popular and affordable tweak that involves applying several layers of painter’s tape directly to the back of your PCBA. The adhesive and paper backing act as an acoustic filter.
This modification blocks high-frequency sounds from passing through the board, letting only the deeper, lower-pitched frequencies escape. The result is a deeper, more solid typing sound that emphasizes the “thock” of your switches.
Sandwich Pads
A sandwich pad is a solid dampener, typically made of soft silicone or dense poron foam, that is squeezed between the switch plate and the PCBA. It completely seals the gap between these two components.
By eliminating any air pockets between the plate and the board, it mutes the sound of your keyboard. This is a crucial mod if you are trying to design a board that is exceptionally quiet and solid.
Gasket Mount
Gasket mounting is a premium way of holding the internal components inside the keyboard case. Instead of screwing the plate directly to the metal or plastic frame, soft rubber, silicone, or foam gaskets are applied to the edges of the plate.
The plate and PCBA assembly are then gently squeezed between the top and bottom case halves. Because the plate never touches the hard case directly, the keyboard has a softer feel, a bouncy flex, and a consistent, isolated sound.
Why Does Switch and LED Orientation Matter So Much?
Switch and LED orientation dictates keycap compatibility and lighting dispersion, with south-facing LEDs being the preferred design to prevent physical interference with premium keycaps. If you get this wrong, your keys will feel mushy and sound uneven.
To understand why this happens, we have to look closely at the physical shape of custom keycaps and switch housings.
The Clash of North-Facing LEDs and Cherry Profile Keycaps
Historically, many manufactured keyboards placed the LED at the top of the switch housing, which is known as a “north-facing” design. This was done to illuminate the legends on the top of standard keycaps.
However, custom keycaps often use a shape called the “Cherry profile”. This profile is shorter and more angled than cheap keycaps. On a north-facing board, the inner wall of the keycap will physically strike the top of the switch housing before it fully bottoms out.
This creates a harsh, scraping feeling and an unpleasant, high-pitched clacking noise on the middle row of your keyboard. It ruins any chance of achieving a quiet, deep typing experience.
How South-Facing LEDs Solve the Interference Problem
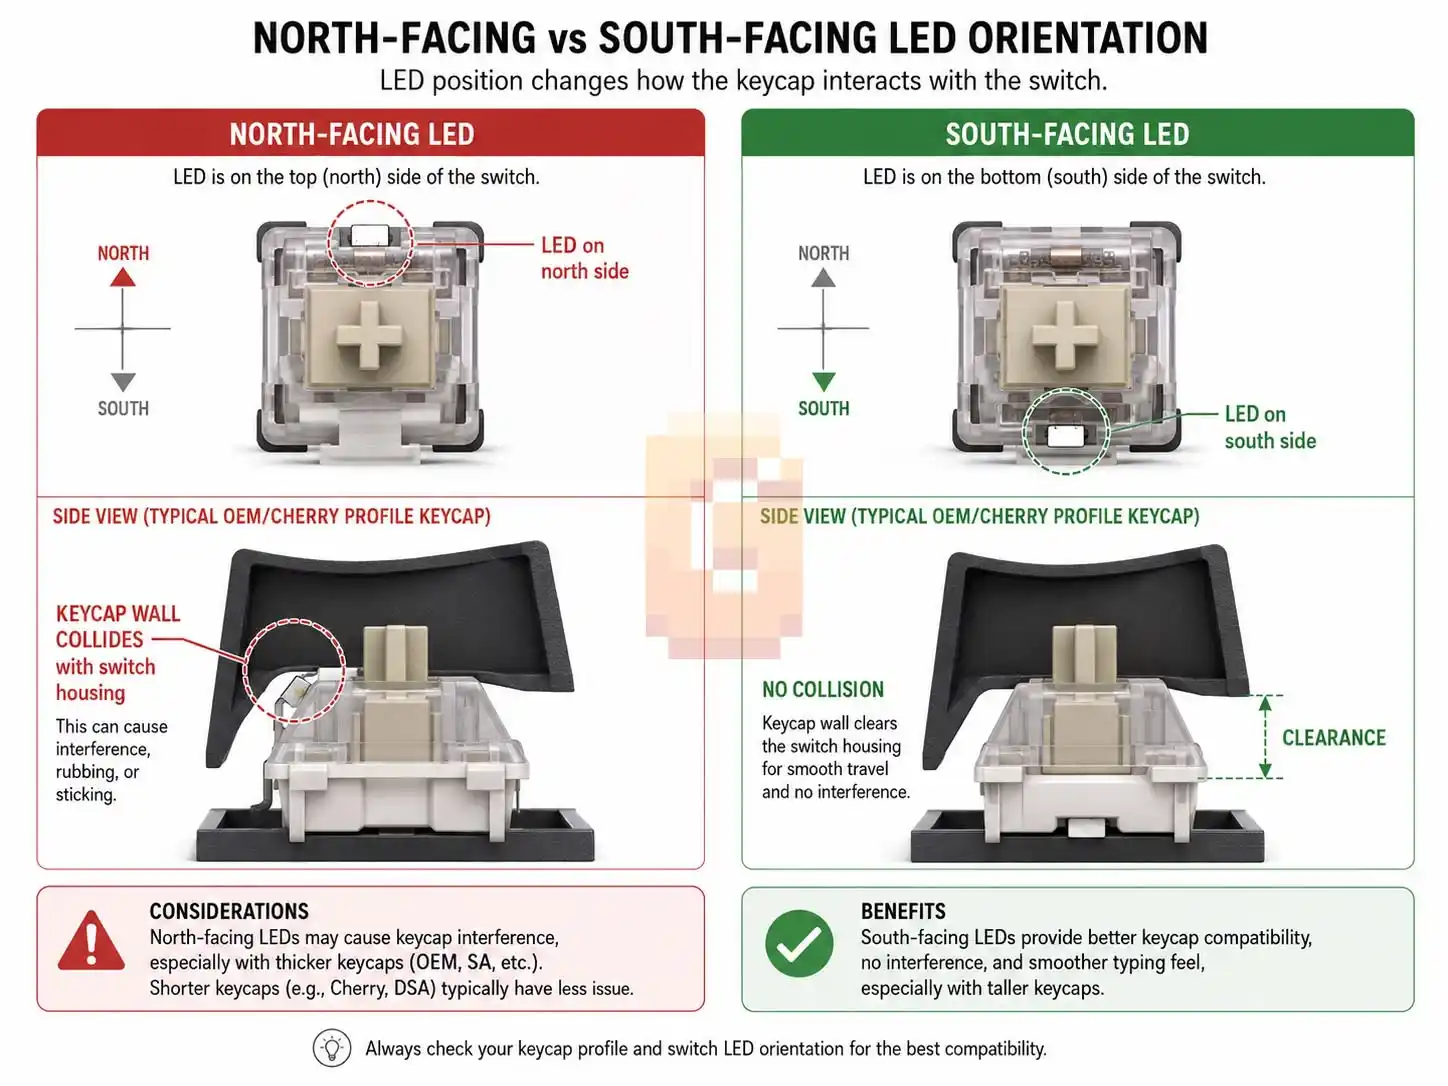
A south-facing board rotates the switch socket 180 degrees, placing the LED at the bottom of the switch housing. This rotation moves the bulky part of the switch out of the way of the descending keycap.
By choosing a south-facing PCBA, you ensure that every single custom keycap profile on the market will fit your keyboard perfectly. You will get a clean, uninterrupted key travel and a consistent sound across the entire board.
How Can You Achieve a Silent Yet Deep and Thocky Sound Profile?
Achieving a silent yet deep and thocky sound profile requires balancing acoustic dampening materials with low-pitched linear switches to mute high-pitched vibrations while preserving a quiet, solid bottom-out sound. You must deliberately eliminate all hollow space inside your keyboard.
Let’s explore the science behind building a board that sounds deep without being loud or distracting to those around you.
Deciphering “Silent” vs. “Thocky”
In the custom keyboard hobby, “silent” and “thocky” are often viewed as opposite goals. True silent switches use tiny internal rubber bumpers to eliminate the sound of the switch hitting the top and bottom of its housing.
However, if you want a quiet, deep, and thocky tone, you are actually looking for a muted, low-pitched sound signature. You want the physical action of typing to sound deep and solid, like a heavy wooden block hitting a table, rather than a loud, sharp snap.
To achieve this, we use dense acoustic dampening to absorb high frequencies while allowing only the lowest bass notes of your switches to resonate. This gives you a quiet typing experience that still feels satisfying.
The Crucial Role of Plate Materials
The plate is the physical barrier that holds your switches in place, and its material dictates both the rigidity and pitch of your keyboard. Hard materials like brass and steel produce a loud, high-pitched “clack”.
For a quiet and deep sound, you should choose soft, flexible plate materials like Polycarbonate (PC), POM, or FR4. These plastics naturally absorb high-frequency vibrations and give the keyboard a softer, more cushioned bottom-out feel.
Selecting the Right Switches and Lubricants
If you are using linear switches, you have the starting point for a quiet, deep build. Linear switches have smooth stems with no tactile bumps or clicks, making them quieter than other styles.
To deepen their sound even further, you must lubricate them. Applying a thin layer of grease like Krytox 205g0 to the slider rails, stem, and spring of your switches eliminates plastic-on-plastic friction and metallic spring ping, leaving you with a refined, deep sound.
If you’re trying to choose between Hall Effect keyboards before you start modding, our Ying75 Cyber Graffiti vs Tofu60 HE vs Holy60 HE comparison breaks down the key differences between three of the top options.
Which Keyboard Modifications Offer the Best Results for Beginners?
Ranking keyboard upgrades by their ease of execution and acoustic impact allows beginners to achieve maximum results with minimal risk of damaging sensitive electronics. Some modifications take only five minutes but completely transform your typing experience.
Let’s rank the most common keyboard mods from the easiest to the most difficult, keeping your goal of a deep, quiet build in mind.
The Ease and Impact Matrix of Keyboard Modifications
| Modification | Difficulty | Acoustic Impact | Primary Sound Effect |
| Keycap Replacement | ★☆☆☆☆ (Very Easy) | High | Sets the baseline pitch of your keyboard |
| The Tape Mod | ★☆☆☆☆ (Very Easy) | High | Filters out high pitches for a deeper sound |
| Case Foam Mod | ★☆☆☆☆ (Very Easy) | Medium | Eliminates hollow echoes and case ping |
| Switch Swapping | ★★☆☆☆ (Easy) | Very High | Changes the core typing feel and sound |
| PE Foam / Plate Foam | ★★☆☆☆ (Easy) | High | Creates a clean, poppy, or muted signature |
| Switch Lubing | ★★★☆☆ (Medium) | Very High | Eliminates friction, scratchiness, and ping |
| Stabilizer Tuning | ★★★☆☆ (Medium) | Very High | Eliminates rattling on the spacebar and shift keys |
Easy Mods (Keycaps, Tape Mod, Case Foam)
Changing your keycaps is the easiest way to alter your board’s acoustics. For a deep, thocky sound, look for thick PBT keycaps with tall profiles, such as MT3 or SA profiles, as thicker plastic naturally creates lower tones.
The tape mod is simple and effective. By placing two or three layers of blue painter’s tape on the back of your PCBA, you can instantly turn a bright, thin-sounding keyboard into a deep and solid one.
Adding case foam is another beginner-friendly mod. Simply unscrew your keyboard case, cut a piece of neoprene, poron, or packing foam to fit the bottom, and place it inside to destroy any hollow echo.
Medium Mods (Switch Swapping and Foams)
Using a hot-swappable keyboard makes swapping your switches incredibly easy. It takes some patience to pull out sixty switches without bending the metal pins, but it is a rewarding way to experiment with different linear options.
Installing plate foam or PE foam requires you to take your keyboard apart, which can be slightly intimidating for a beginner. However, sandwiching these foams between the plate and PCBA is an effective way to quiet down your build.
If you want to see what this foam-first philosophy looks like when applied by a manufacturer at a premium level, our WLMOUSE Ying75 HE review is worth a look. WLMOUSE uses a six-layer Japanese Inoue Poron stack — a high-density microcellular polyurethane foam that is the industrial equivalent of the sandwich foam described above — to achieve a deep, marbly acoustic profile right out of the box, with no manual modding required. Seeing how a production keyboard engineers these layers is one of the fastest ways to understand why each dampening material targets a different frequency range.
Hard Mods (Switch Lubing and Stabilizer Tuning)
Lubing your switches is a tedious process that requires you to open up every single switch, paint a thin layer of grease onto the internal parts, and reassemble them. It takes hours of focus, but it is the ultimate way to get a smooth, quiet keyboard.
Tuning your stabilizers is challenging but absolutely necessary. Stabilizers are the metal wires that support large keys like your spacebar, and if you do not lube them properly with dielectric grease, they will rattle loudly and ruin your silent sound profile.
Is the KBDfans Tofu60 Redux Actually a Gasket Mount Keyboard?
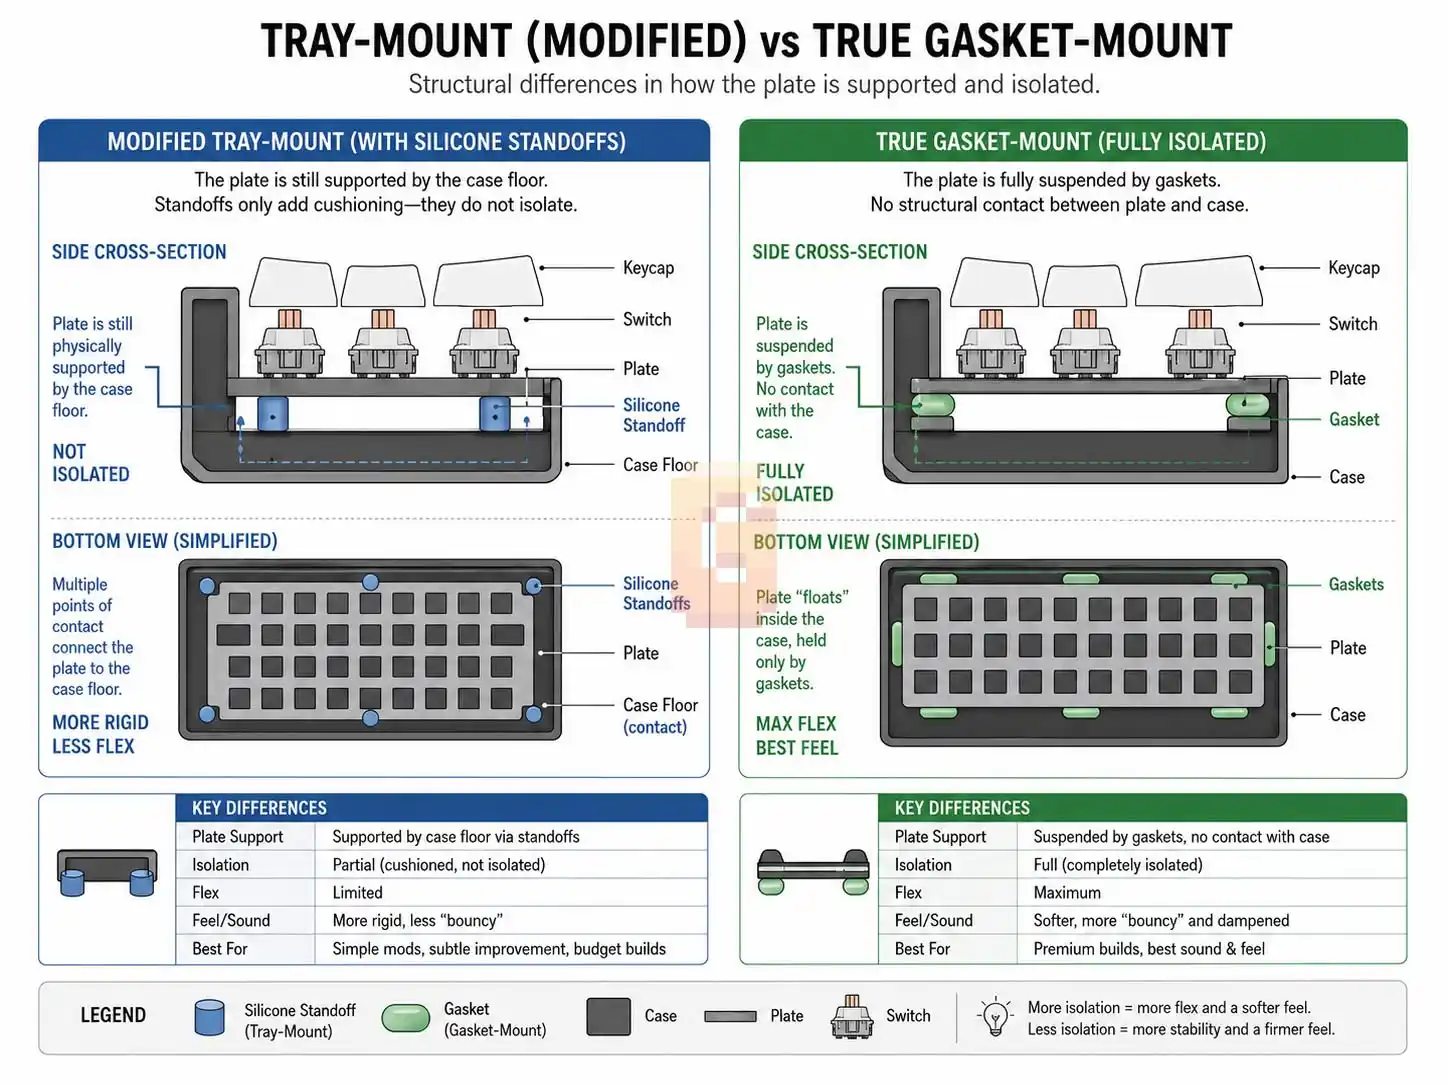
No, the KBDfans Tofu60 Redux is structurally an evolved tray-mount case that uses silicone standoffs, rather than a true gasket-mount design. While it is an exceptional aluminum case, it does not hold the plate in a suspended, floating state like a pure gasket mount.
It is important to understand the structural differences between these two designs before spending your hard-earned money.
The Original Tofu60 vs. The Redux Version
The original KBDfans Tofu60 is one of the most famous keyboards in the history of the hobby. It was a classic tray-mount case, meaning the PCBA screwed directly into stiff metal pillars integrated into the bottom of the aluminum shell.
This direct metal-on-metal connection made the original Tofu feel stiff to type on, and it often produced an uneven, high-pitched sound across different areas of the keyboard.
The Tofu60 Redux is a complete redesign of this classic case. KBDfans removed the stiff central standoffs and replaced them with a modified system designed to improve both the feel and sound of the board.
How the Redux “Silicone Bowl” System Works
Instead of eliminating standoffs entirely, the Tofu60 Redux uses a hybrid design. It features screw posts at the bottom of the case, but it wraps them in soft silicone “bowls” or “socks.”
Your PCBA rests on these silicone cushions rather than directly on the metal. This “force-break” layer absorbs harsh vibrations, reduces stiffness, and prevents metallic ringing, giving you a typing experience that feels remarkably soft.
Why This Distinction Matters for Your Build
Even though the Tofu60 Redux is an incredible case that sounds deeply resonant, it is structurally still a tray-mount keyboard. The PCB is still physically held in place by screws pointing downward into the bottom case.
If you are looking for a true, uncompromising gasket mount where the plate is entirely suspended by soft foam tabs and has zero contact with any standoffs, the Tofu60 Redux does not fit that description. For a true gasket experience, you must look at a different class of board.
The Best Barebones Keyboard Kits for a Silent, Deep, and Thocky 60% Layout
The best barebones kits for a deep, quiet 60% layout feature solid aluminum cases, true gasket mounting, hot-swappable south-facing PCBs, and full QMK/VIA compatibility. If you already own switches and keycaps, buying a barebones kit is the most cost-effective path forward.
Worth noting: not all compact keyboards use standard layouts. The Wooting 80HE, for example, uses a proprietary form factor that won’t fit standard 75% cases — something our Wooting 80HE vs Ying75 comparison covers in full if you’re deciding between the two.
Let’s look at the options currently on the market that meet every single one of your strict requirements.
What Exactly is a “Barebones” Kit?
A barebones kit is a semi-assembled keyboard package that includes the outer case, the internal mounting plate, the PCBA, and the stabilizers. It intentionally leaves out the switches and keycaps so you can install your own.
This is the perfect option for your project because you won’t waste any money on stock switches or cheap keycaps that you would immediately throw away. It gives you a high-quality foundation to build upon.
The Top Recommendation: The Keychron Q60 Max
The Keychron Q60 Max is a heavy, fully CNC-machined aluminum keyboard that serves as the gold standard for high-quality, accessible custom builds. It is a wired-compatible design that matches your requirements.
| Feature | How It Fits Your Build |
| True 60% Layout | Ultra-compact, standard ANSI design |
| True Double-Gasket Mount | Suspends the plate with soft poron |
| Hot-Swappable PCBA | Zero soldering required for switches |
| South-Facing RGB LEDs | Absolute keycap compatibility |
| CNC Aluminum Case | Eliminates plastic vibrations |
| QMK/VIA Compatibility | Easy, future-proof customization |
The double-gasket mount inside the Keychron Q60 Max completely isolates the internal plate from the aluminum shell. This creates a soft, cushioned bottom-out feeling and a quiet, deeply resonant sound that is perfect for a quiet, thocky build.
Furthermore, the Q60 Max is fully compatible with QMK and VIA open-source firmware. This means you can easily remap any key, program custom layers, and change your lighting layouts on the fly using a simple web interface, ensuring your keyboard is fully future-proof.
The Custom Option: KBDfans Tofu60 Redux (With the DZ60RGB PCBA)
If you decide that you prefer the clean aesthetic of the Tofu series and do not mind its hybrid tray-mount design, you can construct an incredible custom build using the Tofu60 Redux case.
To build this, you would buy the Tofu60 Redux case and pair it with KBDfans’ DZ60RGB-ANSI V3 Hot-Swap PCBA. This board features south-facing LEDs, high-quality Kailh hot-swap sockets, and full VIA compatibility.
While it won’t have the same bouncy flex as the Keychron Q60 Max, the heavy aluminum body of the Tofu60 Redux combined with the silicone standoff covers will still produce a clean, deep, and muted sound profile.
How Do You Assemble and Mod Your Keyboard for the Ultimate Sound?
Assembling a silent, thocky custom keyboard involves preparing the stabilizers first, applying board-level dampening mods, installing the switches, and configuring your firmware. Taking your time during this step-by-step process is crucial for preventing unwanted rattles and echoes.
Let’s walk through the entire building process from scratch, ensuring you know exactly how to execute every single modification correctly.
Step 1: Pre-Testing and Disassembling Your Kit
Before you do any modifications, you must ensure that your hardware is functioning correctly. Plug your barebones PCBA into your computer using your USB-C cable.
Open up a browser-based testing tool like usevia.app. Take a pair of metal tweezers and gently touch the two metal pads of every single hot-swap socket on the back of the board.
If the corresponding key lights up on your screen, your board is working correctly. Once you have verified this, use your screwdriver to carefully open up your keyboard case and separate the plate, foam, and PCBA.
Step 2: Tuning and Lubing Your Stabilizers
Stabilizers are the plastic housings and metal wires that sit under your larger keys, like the spacebar and shift keys. If you do not tune them, they will rattle loudly, completely ruining your quiet sound profile.
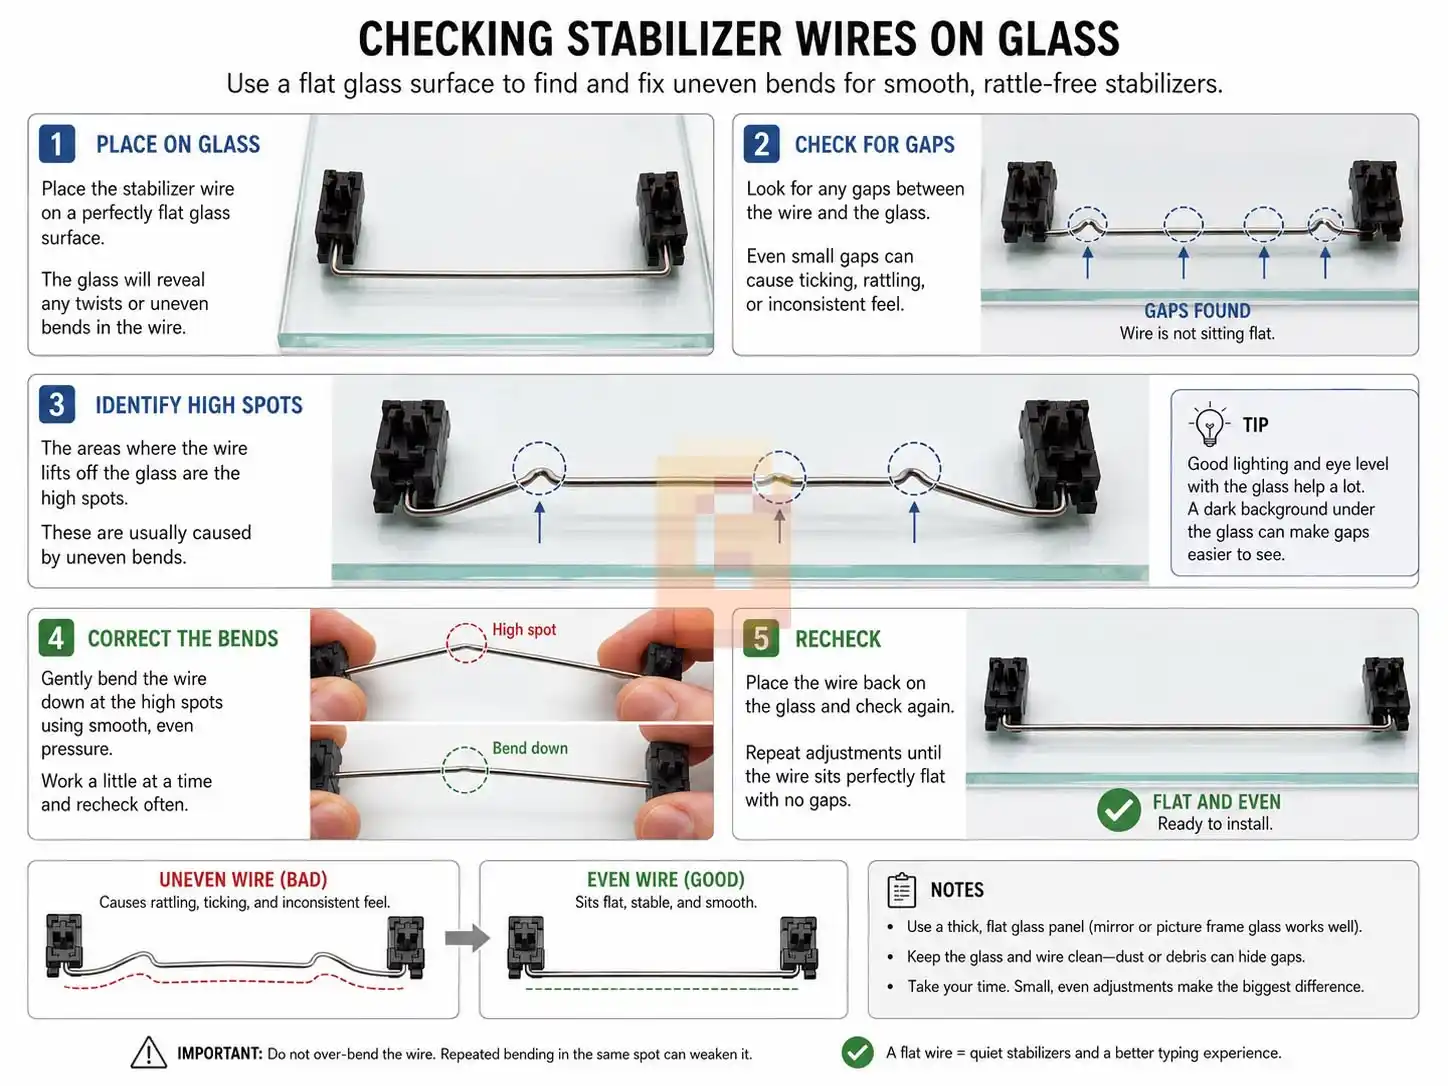
Carefully clip the stabilizers off your board or plate. Take the metal wires and place them on a completely flat surface, like a sheet of glass, to check if they are bent.
If the wire wobbles when you press on the corners, use your fingers or a pair of pliers to gently bend it until it rests perfectly flat. This simple step eliminates almost all stabilizer rattle.
Next, use a small brush to apply a thin layer of Krytox 205g0 to the inside of the plastic stabilizer sliders. Then, dip the ends of the metal wire into a thicker grease, like dielectric grease, before sliding them back into the plastic housings.
Step 3: Executing the Tape Mod and Case Foam
With your PCBA separated from the case, lay it face down on a soft clean surface. Take high-quality blue painter’s tape and apply two to three layers across the entire back of the board.
Make sure you press the tape down firmly around the hot-swap sockets, and use a small hobby knife or a pin to puncture holes through the tape where the case screws and JST cable connectors need to pass through.
Next, look at your bottom case housing. If there is a large, empty cavity at the bottom, place a pre-cut layer of dense neoprene or poron foam inside to fill the void, ensuring you do not block the USB-C daughterboard connector.
Step 4: Installing the Gaskets and Reassembling the Plate
If you are using a true gasket-mount board like the Keychron Q60 Max, apply the included poron foam or silicone gaskets along the designated tabs on the edges of your plate.
Layer your components together like a sandwich: place the case foam at the bottom, then the taped PCBA, then your plate foam, and finally your plate on top. Gently lower this completed assembly back into your case.
When screwing the case halves back together, tighten the screws in an “X” pattern to ensure even pressure is applied across all of the gaskets. Do not over-tighten them, as you want to preserve the natural flex of the gaskets.
Step 5: Safely Installing Your Linear Switches
Now that your keyboard is reassembled, it is time to install your switches. Before inserting a switch, look closely at the two thin copper pins on the bottom of the housing to make sure they are completely straight.
If a pin is slightly bent, use your fingers or a pair of tweezers to gently straighten it out. Hold the switch straight over the socket and press it straight down until you hear it click into the plate.
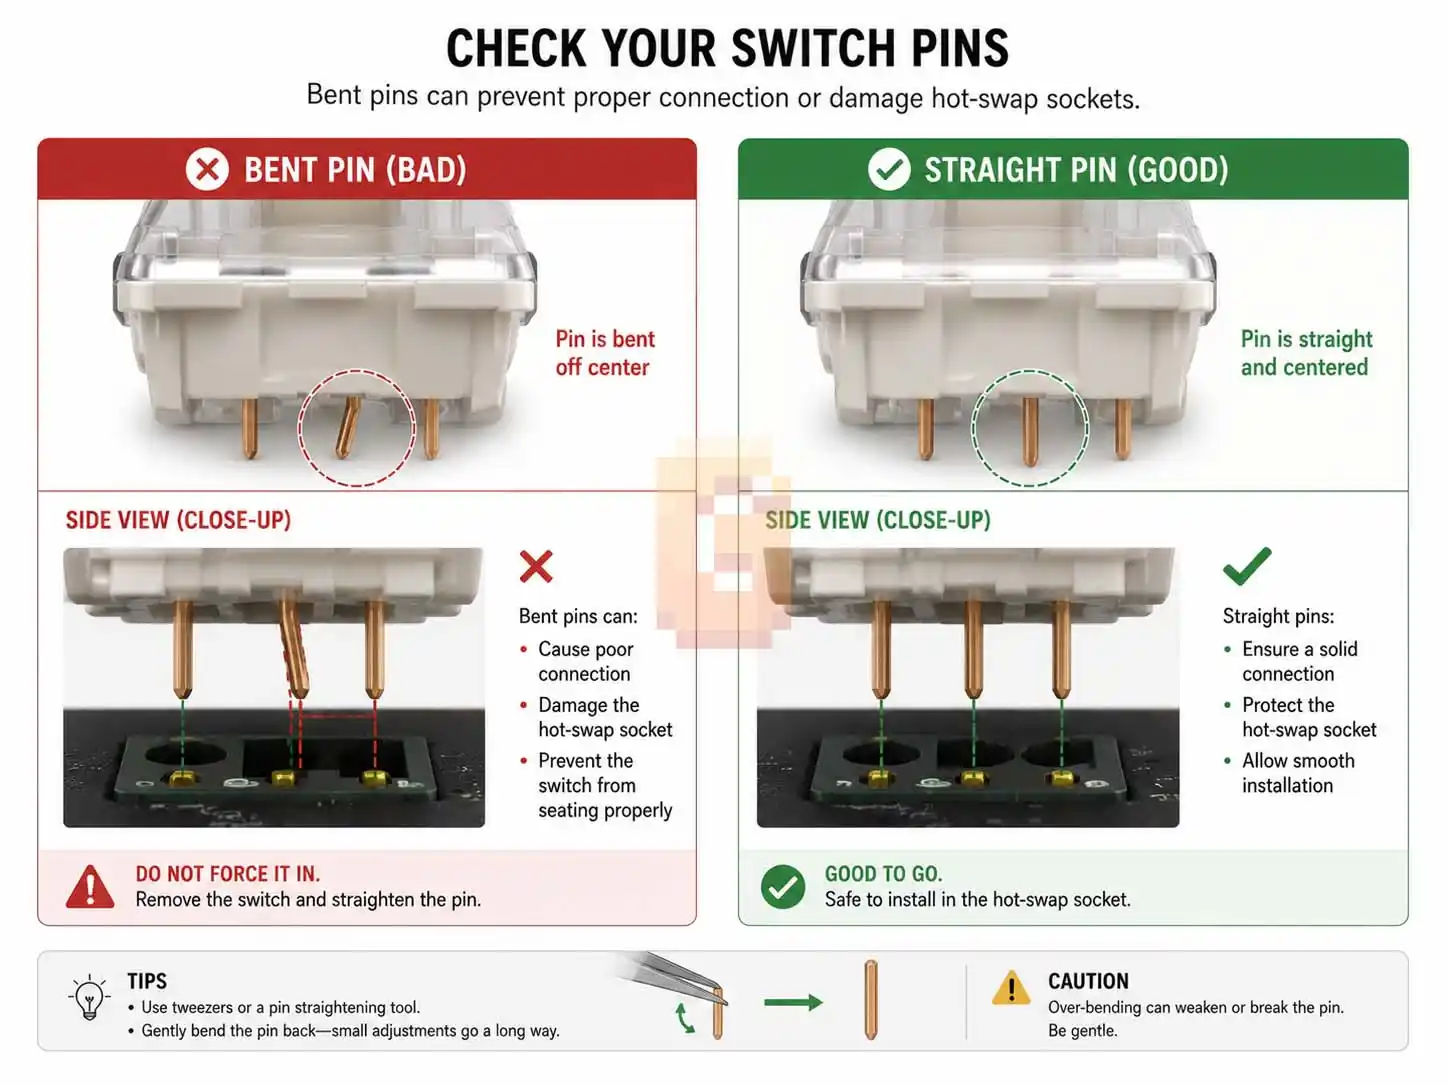
If you feel any harsh resistance when pushing a switch in, stop immediately. Pull the switch back out and check the pins again; forcing a bent pin into a hot-swap socket can easily tear the socket right off the back of your PCBA.
Step 6: Installing Keycaps and Final Firmware Configuration
Once all of your switches are securely installed, plug your keyboard back into your computer and run a final key test to ensure every single key is registering correctly.
Once you have verified that everything is working, press your PBT keycaps onto the switch stems. Since your board features south-facing LEDs, you can use any premium keycap profile without worrying about interference.
Finally, open up the VIA configuration website to remap any keys to your liking. You can set up custom function layers, change your RGB lighting effects, and design custom macros to make your typing experience personalized.
Comprehensive Deep-Dive: A Complete Overview of Keyboard Plate Materials and Acoustic Physics

To master the craft of custom keyboard building, we must look closely at how sound waves behave inside a small plastic or metal case. Every time your linear switch stem bottoms out, it sends a wave of energy propagating through your keycaps, down the switch stem, into the switch housing, and directly into the mounting plate.
This energy behaves like a ripple in a pond. If the plate is made of an extremely stiff, dense material like carbon fiber, brass, or stainless steel, it will refuse to absorb this energy. Instead, it will reflect the sound waves back up through your switch housing and keycaps, resulting in a loud, sharp, high-pitched acoustic spike that is commonly referred to as “clack.”
Conversely, soft, flexible materials act as natural shock absorbers. Let’s analyze the properties of the most popular plate options to help you choose the best one for your quiet, deep-toned build.
- Polycarbonate (PC) Plates
Polycarbonate is an amorphous thermoplastic known for its incredible impact resistance and high flexibility. In mechanical keyboards, PC plates are widely favored for their extremely deep, muted, and low-pitched acoustic signature.
Because the material is soft, it absorbs high-frequency vibrations rather than bouncing them back. This results in a cushioned, slightly bouncy bottom-out experience that is comfortable for long typing sessions.
- POM (Polyoxymethylene) Plates
POM, also known as acetal or polyacetal, is a high-performance engineering thermoplastic characterized by its stiffness, low friction, and excellent dimensional stability. Acoustically, POM sits comfortably between polycarbonate and FR4.
It provides a slightly crisper bottom-out sound than polycarbonate while maintaining a very deep, quiet profile. If you want a deep sound that still offers a subtle, satisfying snap on bottom-out, POM is a fantastic choice.
- FR4 Plates
FR4 is a flame-retardant epoxy fiberglass material that is used to make printed circuit boards. In keyboard plates, FR4 offers an exceptionally balanced, middle-ground typing feel and sound profile.
It is stiffer than POM and polycarbonate, meaning it provides a consistent, stable typing surface with slightly less flex. However, because it is made of woven fiberglass, it still manages to filter out harsh, high-pitched metallic ringing, giving you a clean, “poppy” tone.
- Aluminum Plates
Aluminum is the most common plate material included in standard barebones kits. While it is incredibly durable and provides a consistent typing surface, it is relatively stiff and has a higher resonant frequency than plastics.
If you use an aluminum plate in a compact keyboard without proper foam dampening, you will likely experience a loud, higher-pitched sound signature with a noticeable metallic ring or “ping.” We recommend upgrading to a plastic plate if your primary goal is a quiet, deep, and thocky sound.
Understanding the Mechanics of Custom Linear Switches
For builders using linear switches, here is exactly how their physical design dictates sound and feel. Linear switches are defined by their smooth, uninterrupted travel from the top of the stroke to the very bottom.
Unlike tactile switches, which feature a physical bump to signal actuation, or clicky switches, which use a click jacket or click bar to make a sharp noise, linear switches rely entirely on smooth sliding surfaces. This makes them the perfect candidate for building a quiet, deeply acoustic keyboard.
Housing Materials: Nylon vs. Polycarbonate
The plastic blend used to manufacture your switch housing has a massive impact on its pitch. Nylon is a relatively soft, dense plastic that naturally dampens sound, making it the premier housing material for producing a deep, classic “thock.”
Polycarbonate switch housings are much harder and stiffer. They are often used for keyboards with bright RGB lighting because the plastic is completely transparent, but they produce a much louder, higher-pitched clack upon bottom-out.
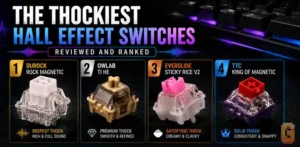
The same housing-material logic applies to Hall Effect switches — see our ranking of the thockiest Hall Effect switches for how magnetic designs stack up acoustically.
Stem Materials: POM and Specialized Blends
The switch stem, which is the colored plastic part that slides up and down, is almost always made of POM due to the material’s self-lubricating properties. However, many modern switches use proprietary plastic blends to alter the sound and smoothness of the travel.
Some stems feature a “long pole” design, meaning the bottom of the stem is elongated and strikes the bottom of the housing before the outer shoulders do. This creates a much more concentrated, loud, and crisp bottom-out sound that can be satisfying, though it is slightly louder than standard-length stems.
Step-by-Step Guide to Custom Switch Lubing (The Art of Krytox 205g0)
If you are using linear switches, you have the starting point for a quiet, deep build. Linear switches have smooth stems with no tactile bumps or clicks, making them quieter than other styles.
If you want to achieve an incredibly smooth, scratch-free typing feel and a refined, deep sound, lubing your linear switches is a non-negotiable step. While it is a tedious process that can take up to four hours for a full 60% keyboard, the results are absolutely transformative.
Before you begin, gather your supplies: a switch opener, a small fine-tipped paintbrush (size 0 or 00), a stem holder, a clean workspace, and a high-quality fluorinated grease like Krytox GPL 205g0.
- Safely Opening the Switch Housing
Place your linear switch into your switch opener and press down firmly. The opener will gently spread the four plastic clips holding the top and bottom housings together, allowing you to separate the components.
Be careful as you pull the switch apart. The internal spring is under tension and can easily fly across the room if you are not paying attention. Organize your switches into four distinct piles: top housings, bottom housings, stems, and springs.
- Lubing the Bottom Housing
Dip your paintbrush into your Krytox 205g0 grease and wipe off any excess on the side of the container. You want the brush to have an incredibly thin, almost translucent layer of grease; a thick, white layer of lube will make your switches feel mushy and sluggish.
Gently paint the two internal slider rails where the stem slides up and down. Next, apply a tiny amount of grease to the bottom floor of the housing where the center pole of the stem makes physical contact.
- Lubing the Switch Spring
Spring ping is a frustrating, high-pitched metallic ringing sound that occurs when a dry metal spring vibrates against the plastic housing after a keypress. Lubing your springs is the best way to eliminate this noise.
You can paint each spring individually by applying a thin layer of grease to the top and bottom coils. Alternatively, you can use the “bag lubing” method: place all your springs into a small plastic bag, add a few drops of high-quality synthetic oil (like Krytox GPL 105), blow air into the bag to inflate it, and shake it vigorously for one minute to distribute the oil evenly.
- Painting the Switch Stem
Hold your switch stem firmly using your stem holder or tweezers. Apply an incredibly thin layer of Krytox 205g0 to the two flat slider rails on the sides of the stem.
Next, paint the front and back flat faces of the stem, ensuring you do not get any grease on the center legs that actuate the copper leaf inside the housing. If you are using a standard-length stem, you can apply a micro-thin layer of lube to the center pole to help cushion the bottom-out sound.
- Reassembling and Testing Your Switch
Place your lubricated spring back into the center of the bottom housing. Align the stem so that the flat slider rails match up with the rails on the housing, and gently lower it onto the spring.
Place the top housing on top of the assembly, making sure the logo on the housing is facing forward, and press down firmly until the side clips snap shut. Press the stem down several times with your finger to distribute the grease evenly and verify that the switch feels incredibly smooth.
Advanced Stabilizer Tuning: The Holee Mod and Band-Aid Mod
Even if your switches are perfectly lubricated and your case is filled with high-density foam, a loose, rattling spacebar will instantly ruin the sound of your entire keyboard. Stabilizers require patience and fine-tuning to perfect.
Let’s explore two effective, advanced tuning techniques that custom keyboard builders use to eliminate every single trace of stabilizer wobble and rattle.
The Band-Aid Mod (Cushioning the PCB Impact)
When a stabilizer housing is secured to your PCBA, it can still have a tiny amount of physical play, causing the plastic housing to vibrate against the fiberglass board when you type. The Band-Aid mod completely solves this issue.
Cut small, rectangular strips of adhesive fabric band-aid or thin foam tape and apply them directly to the surface of the PCBA where the stabilizer housings rest. When you screw or clip your stabilizers back into place, they will compress this soft fabric layer, dampening any vibrations and creating a solid, cushioned bottom-out sound.
The Holee Mod (Eliminating Wire Play)
The Holee mod is a precise technique designed to eliminate the annoying rattle caused by the metal stabilizer wire shifting around inside the plastic stem housing. It acts as a physical buffer inside the stem.
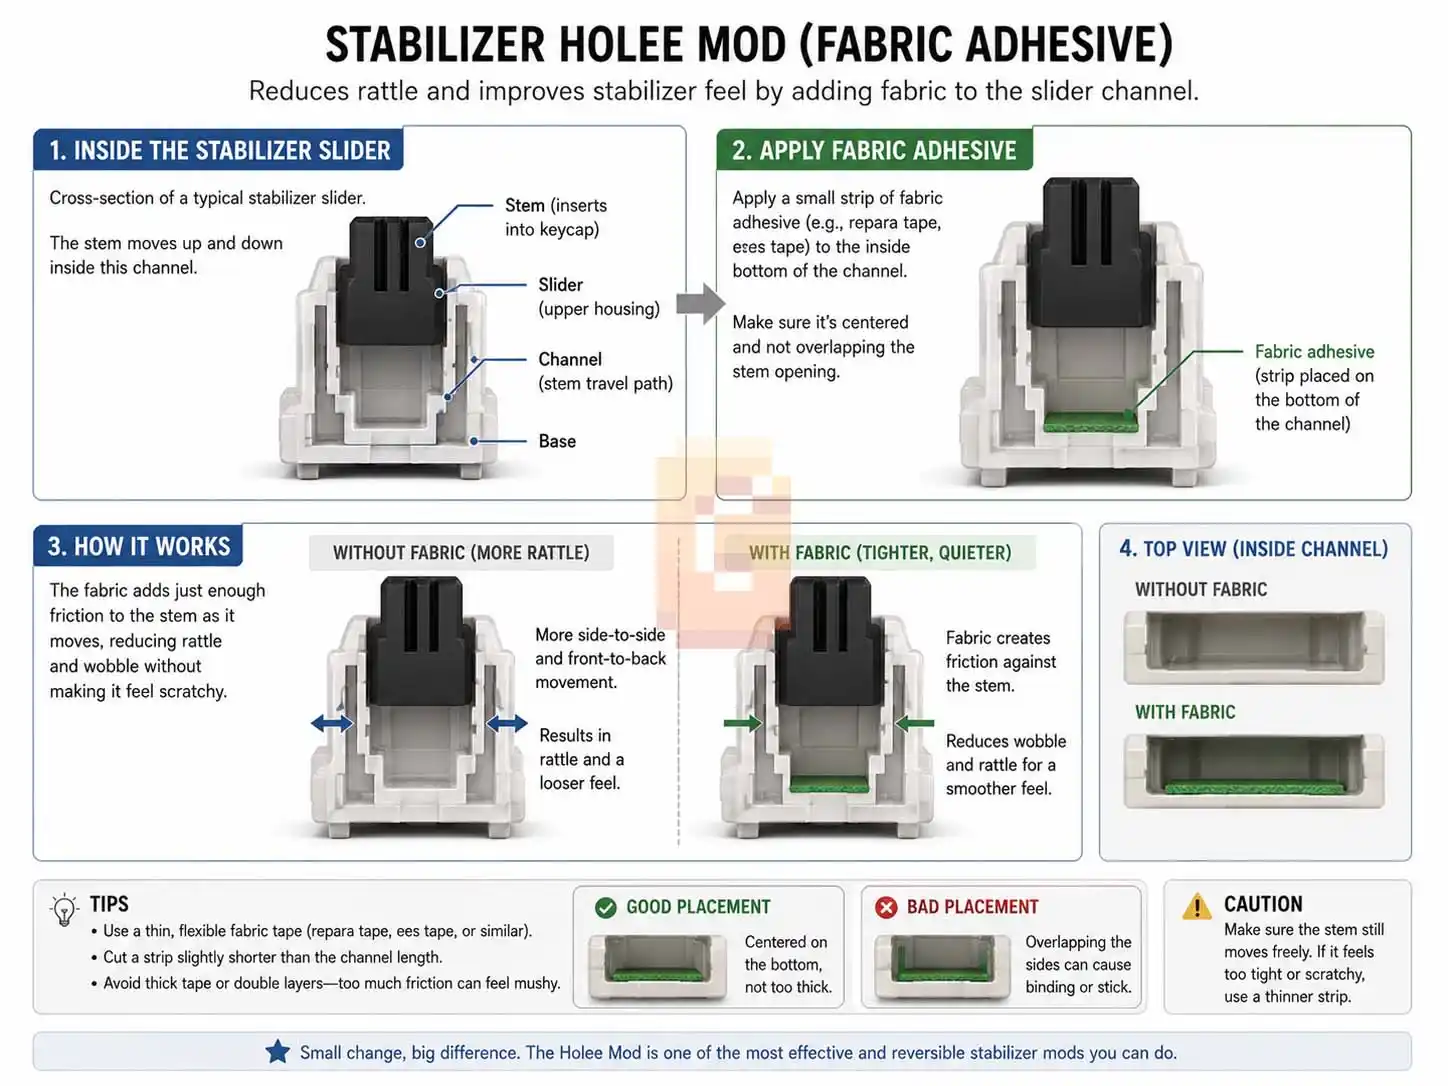
To execute this mod, cut an incredibly thin, tiny strip of adhesive fabric band-aid (approximately 0.2 inches long). Using a pair of fine-tipped tweezers, carefully thread this adhesive fabric strip through the internal L-shaped channel of your stabilizer stem.
Adhere the fabric to the inner walls of the plastic stem. When you insert your lubricated metal wire back into the stem, it will rest snugly against the soft fabric rather than striking the hard plastic walls directly, completely eliminating any high-pitched ticking noises.
The Fine Science of Gaskets and Case Construction
Gasket mounting has completely revolutionized the custom keyboard industry, quickly becoming the preferred mounting style for keyboard enthusiasts worldwide. To understand why it feels and sounds so different from cheap manufactured keyboards, we have to look closely at its physical construction.
In a traditional keyboard, the internal plate is screwed directly to the hard plastic or metal case. This means every time you bottom out a switch, the force of the impact travels directly into the heavy desk beneath you, creating a rigid, fatiguing typing experience and a loud, uneven sound.
A true gasket mount completely isolates the internal assembly. By sandwiching the plate between soft, compressible foam or silicone gaskets, the plate is suspended in a floating state.
When you type, the gaskets compress and absorb the energy of your keystrokes, allowing the entire plate and PCBA assembly to flex slightly downward. This flex dramatically reduces finger fatigue during long writing sessions and isolates the acoustic resonance, giving your keyboard a consistent, and deeply satisfying sound profile.
Deep Dive: PCB Traces, ESD Protection, and Mechanical Socket Durability

When selecting a high-end 60% keyboard, the design and build quality of your hot-swap PCB are just as critical as its overall mounting style. The electrical traces on a premium PCB are laid out to prevent interference and signal cross-talk, which can cause keypresses to double-register or fail to fire completely.
Additionally, top-tier PCBs incorporate electrostatic discharge (ESD) protection chips. This crucial electronic design safeguard stops static shocks—which are easily generated when sliding a keyboard across a desk or touching the metal casing—from frying the sensitive microcontroller at the heart of your PCBA.
When choosing a hot-swap PCB, ensure it utilizes genuine Kailh or Gateron hot-swap sockets. These sockets are rated for hundreds of switch installations, whereas generic, unbranded sockets can easily peel off the solder pads on the back of the board when you insert a switch with slightly crooked pins.
The Geometry of Keycap Profiles and Plastic Blends
Your choice of keycap goes far beyond its colorway or legendary font; the physics of keycap dimensions and plastic composition heavily dictate the final resonance of your custom keyboard. There are two primary plastics used in the manufacture of keycaps: ABS (Acrylonitrile Butadiene Styrene) and PBT (Polybutylene Temperate).
ABS is a relatively hard, rigid plastic that naturally produces a higher-pitched, sharper “clack” when bottoming out. PBT is a denser, softer thermoplastic that is highly resistant to wear, never developing the shiny surface texture common on aged ABS, while naturally yielding a lower-pitched, bassier thock.
Material / Acoustic Property
ABS (Acrylonitrile) / Sharp, high-pitched clack
PBT (Polybutylene) / Deep, low-pitched thock
Keycap profile geometry also plays a vital role. Shorter profiles like Cherry and OEM have a small internal air volume, which results in a tighter, punchier sound. Tall, sculpted profiles like SA, MT3, and High-Profile (HP) act like miniature acoustic chambers, allowing sound waves to bounce and decay, resulting in a hollower, deeply resonant, and heavy acoustic bottom-out.
Spring Physics: Slow-Curve, Progressive, and Multi-Stage Springs
Often overlooked by beginners, the spring inside your linear switch is a major factor in both typing comfort and bottom-out sound. Standard springs have a linear weight curve, meaning the resistance increases smoothly and predictably the further you press the key down.
Slow-curve springs are longer than standard springs and are compressed slightly inside the switch housing even before you press the key. This preload means the switch feels heavier right at the beginning of the keypress, providing a highly consistent resistance profile that prevents accidental keypresses.
Progressive springs feature tightly wound coils at the top and looser coils at the bottom. This unique geometry allows the switch to feel light and fast at the start of the keypress but get progressively heavier toward the bottom, helping to cushion the impact and naturally quiet down your bottom-out sound.
Multi-stage springs (such as dual-stage or triple-stage springs) are divided into distinct segments by flat, uncoiled sections of metal. These springs create a rapid, snappy return bounce when you release the key, giving your linear switches an incredibly active, responsive feel that is highly prized by typists.
Firmware Engineering: Navigating QMK and the Power of VIA Layers
To make your ultra-compact 60% keyboard truly future-proof, you must leverage the incredible capabilities of custom keyboard firmware. QMK (Quantum Mechanical Keyboard) is an open-source firmware system that runs on your keyboard’s microcontroller, allowing for deep, code-level control over every function.
Because a 60% layout removes dedicated arrow keys, a function row, and a numpad, you must rely on firmware layers to access these missing keys. VIA is a graphical user interface that runs in your web browser and interfaces directly with QMK, allowing you to remap keys and create custom configurations without having to write code or compile firmware files.
Layer 0 (Base Layer): Standard alphanumeric layout
Layer 1 (Fn Layer): WASD mapped to arrow keys, number row mapped to F-keys
Layer 2 (Media Layer): Custom volume controls, track skipping, and lighting adjustments
With VIA, you can configure “Tap-Dance” keys, which perform one action when tapped and a completely different action when held down (such as using the Right Shift key as a slash when tapped, but as a shift key when held). This ensures you never have to sacrifice productivity or gaming performance when transitioning to a small, space-saving form factor.
Step-by-Step Troubleshooting for Common Custom Assembly Errors
Even if you follow this guide with absolute care, custom keyboard assembly can occasionally present minor hardware or software issues. Learning how to systematically diagnose these issues is a key part of the custom keyboard hobby.
If a key fails to register after you install your switches, do not panic. Pull the switch out using your switch puller and inspect the bottom; most of the time, the copper pins have bent during installation and are failing to make electrical contact inside the hot-swap socket.
If your spacebar or enter key feels sticky, sluggish, or fails to bounce back up, the most likely culprit is over-lubrication of the stabilizers. Use a clean, dry interdental brush or a cotton swab dipped in isopropyl alcohol to gently wipe away the excess grease inside the stabilizer housings.
If you experience persistent spring ping or scratchiness after lubing your switches, you may need to open them back up and ensure you applied a consistent layer of grease to the slider rails and the top and bottom of the springs. Taking your time to correct these minor issues is a normal, rewarding part of the custom building experience.
Final Blueprint Check for Your Custom 60% Build
Now that we have covered every single aspect of custom keyboard building, you are fully equipped to design a board that matches your vision. By sticking to your core priorities, you are guaranteed to end up with an outstanding, future-proof custom keyboard.
Let’s review your final checklist to ensure everything is prepared before you begin assembly:
- Chassis: Keychron Q60 Max (True double-gasket, CNC aluminum case, hot-swappable, south-facing RGB, wired-only, full QMK/VIA support).
- Switches: Your chosen linear switches, opened up and hand-lubricated with a thin layer of Krytox 205g0 to eliminate all scratchiness.
- Plate: Polycarbonate or POM plate to absorb high frequencies and maximize your deep “thocky” tone.
- Acoustics: Two to three layers of blue painter’s tape on the back of the PCB, dense poron case foam at the bottom of the aluminum housing, and plate foam between the plate and PCBA.
- Stabilizers: Screw-in stabilizers, wire-balanced on a flat surface, with fabric dampening pads on the PCB and wires generously coated in dielectric grease.
By following this precise configuration and taking your time during assembly, you will build an incredibly quiet, solid, and deep-sounding keyboard that will elevate your typing experience to an entirely new level. Take it slow, enjoy the process, and get ready to experience the ultimate joy of writing on a keyboard you customized entirely by hand. Happy building!
Custom Mechanical Keyboard FAQ
What is the difference between a hot-swap and a soldered PCB?
A hot-swap PCB has pre-installed sockets that allow you to push switches in and pull them out by hand. A soldered PCB requires you to use a soldering iron to melt metal alloy onto the board to physically connect and secure each individual switch.
Will south-facing LEDs make my keyboard’s RGB backlighting look dimmer?
Yes, south-facing LEDs will appear slightly dimmer if you use keycaps with translucent legends on the top of the caps. However, they provide excellent lighting dispersion around the base of the keycaps and completely prevent physical interference issues with custom Cherry profile keycaps.
Why is a polycarbonate plate better for achieving a deep, thocky sound?
Polycarbonate is a soft, highly flexible plastic that naturally absorbs high-frequency vibrations rather than reflecting them. This dampening effect mutes high-pitched clacks and metallic ringing, allowing only the deepest, lowest bass tones of your switches to resonate throughout the case.
Can I use any tape for the Tempest tape mod on my PCBA?
No, you should strictly use non-conductive, easily removable tape like blue painter’s tape or masking tape. Avoid using duct tape, electrical tape, or packing tape, as their heavy adhesives can leave a damaging residue or build up static electricity that could short out your electronics.
What does the JST cable do inside a custom keyboard?
A JST cable is a flexible wire bundle that connects the main PCBA to a separate, smaller USB-C daughterboard secured to the case. This design protects the main board from the physical stress of cable plugging and allows the gasket-mounted assembly to flex freely inside the housing.
Conclusion and Next Steps
Building a silent, deep, and thocky 60% keyboard is a rewarding project that is easily achievable when you use this keyboard modding guide as your roadmap. By avoiding confusing marketing, utilizing south-facing hot-swap components, and choosing a true gasket-mount kit like the Keychron Q60 Max, you will establish an outstanding foundation for your build.
Let’s recap the most critical rules to keep in mind as you begin your modding journey:
- Prioritize South-Facing Sockets: This ensures complete compatibility with high-quality Cherry profile keycaps.
- Opt for True Gasket Mounting: True isolation of the plate is essential for a soft, cushioned typing experience and clean acoustics.
- Use Soft Plates and Dampening: Choose POM or Polycarbonate plates, apply the tape mod, and use case foam to eliminate high-pitched noises.
- Never Rush Stabilizer Tuning: A rattling spacebar will ruin an otherwise quiet and deep sound signature.
Now that you have all the knowledge you need, the next step is to choose your barebones foundation. Head over to your preferred mechanical keyboard vendor, select a high-quality gasket-mount kit, and start assembling the keyboard of your dreams! Have fun with your build, and happy typing!
References
- Keyboard sizes, parts, and assembly fundamentals: Keyboard University
- Open-source keyboard firmware design, configurations, and flashing: QMK Firmware
- Advanced layout remapping tools and runtime firmware key adjustment interfaces: VIA Configurator