How Video Game Frames Are Rendered: GPU Pipeline Explained

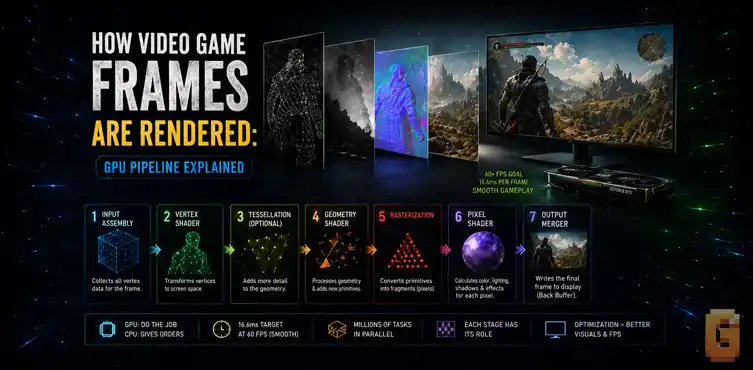

Rendering a game frame is a coordinated handoff where the CPU calculates game logic, compiles instructions called draw calls, and sends them to the GPU. The GPU then builds the 3D geometry, rasterizes it into a 2D pixel grid, applies textures and lighting, and writes the final image to a memory buffer for your monitor to display.
What is a Frame Buffer and Why Does It Matter?
A frame buffer is a dedicated region of high-speed video memory (VRAM) that stores the final color values of every pixel for a completed frame before it is sent to the display. It acts as the ultimate destination for the rendering pipeline, holding the completed image so the display controller can read it out continuously.
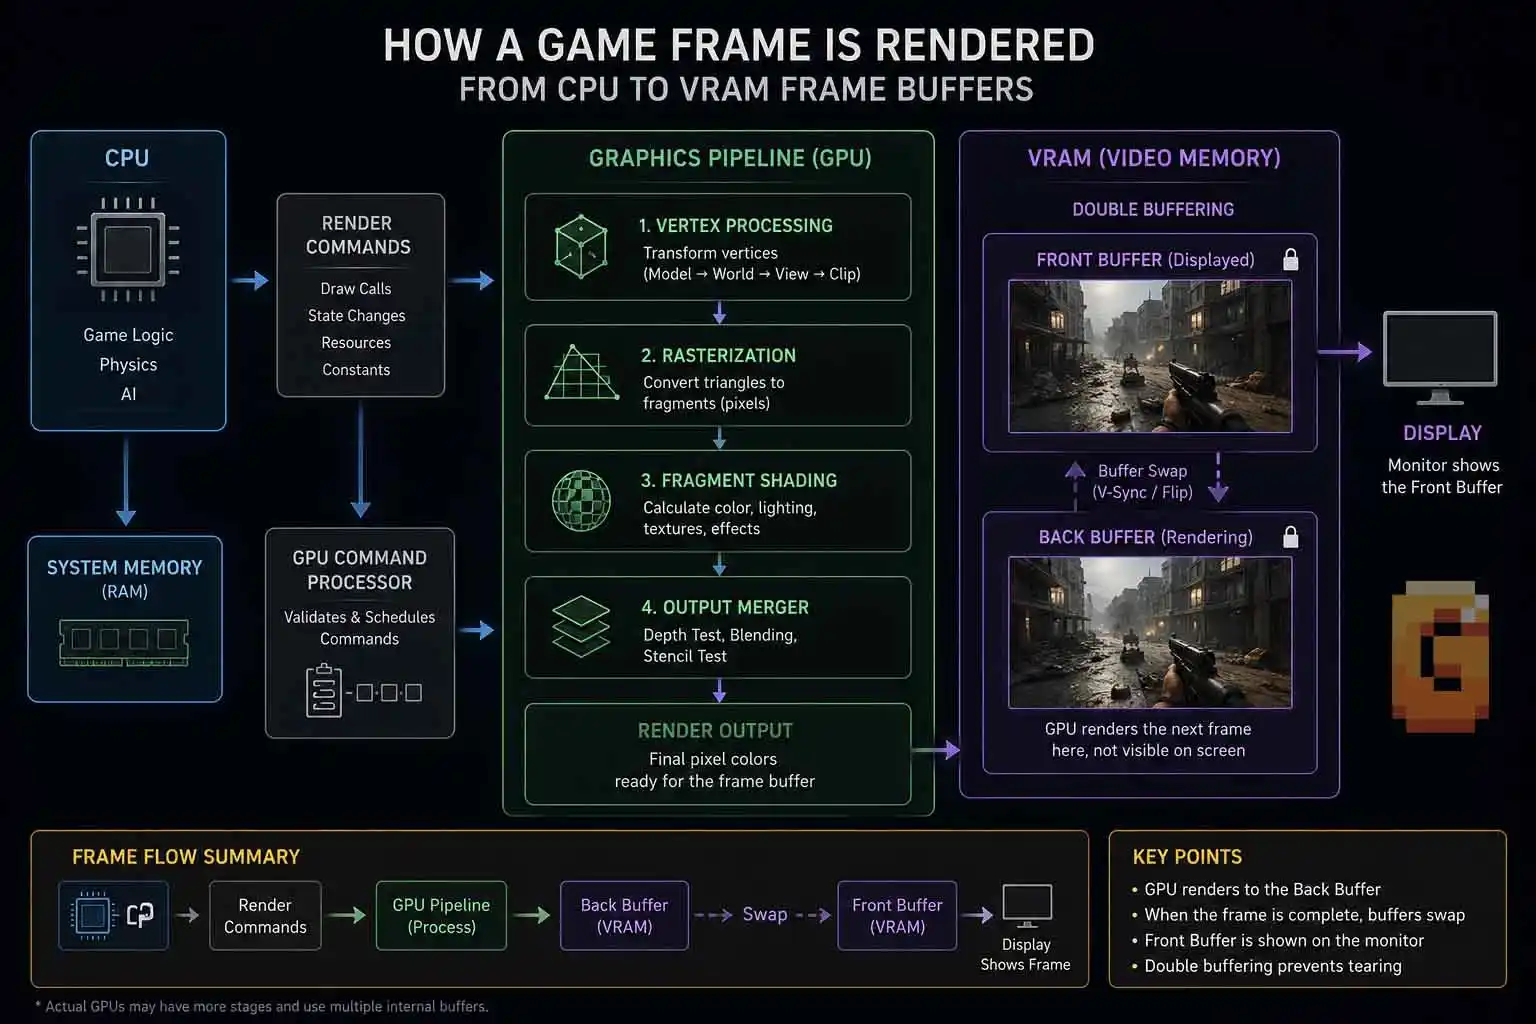
Every single image you see on your monitor starts as raw mathematical data and ends as a physical array of light. To understand how video game frames are rendered, we first have to look at the finish line. This is a temporary holding zone in your graphics card’s memory called the frame buffer.
Think of it as a blank digital canvas where the GPU paints the pixels before showing them to you. When we ask what is a frame buffer, we are looking at the final assembly line of the rendering pipeline. The buffer acts as the transition point between the graphics card and your display.
The frame buffer is actually split into two physical regions: the front buffer and the back buffer. The GPU writes new pixel details to the back buffer while your monitor reads completed frames from the front buffer. This technique, called double buffering, prevents your display from showing a half-finished image.
Step 1: The CPU’s Job — Draw Calls and Game Logic
The CPU acts as the supervisor of the rendering process, calculating the game’s physics, input, and AI before packaging these coordinates into commands called draw calls for the GPU. Without the CPU translating the game state into these hardware instructions, the graphics card would have no instructions on what objects to render.
Every frame starts with game logic. When you trigger an action in a game, the CPU calculates how your input changes the virtual environment. It runs physics, checks for collisions, and updates the coordinates of every 3D object in the scene.
Once the game state is updated, the CPU translates this data for the GPU. The processor compiles these 3D coordinates and textures into specialized instructions called draw calls.
But what are draw calls in gaming exactly? A draw call is a software command sent from the CPU to the GPU. It tells the graphics card which 3D model to render, what texture to apply, and where to position it. If your CPU takes too long to package these commands, your GPU sits idle, resulting in a CPU bottleneck.
The CPU sends these completed draw calls through the motherboard’s high-speed PCI Express (PCIe) lanes. The GPU’s dedicated hardware Command Processor reads these incoming packets and schedules them across thousands of parallel processor cores.
Step 2: Vertex Processing — Building the 3D World
Vertex processing is the stage where the GPU takes the raw 3D coordinates (vertices) of game models and transforms them into a 2D coordinate system matching the perspective of your screen. This mathematical translation ensures that objects appear at the correct size, angle, and position relative to the virtual camera.
Every 3D object in a game is made of triangles, and every triangle is defined by three points called vertices. The GPU’s primary compute engines—known as CUDA cores on NVIDIA cards or Stream Processors on AMD hardware—take these vertices and run mathematical formulas on them.
So, what does a vertex shader do during this stage? A vertex shader is a specialized program that calculates the 3D position of each vertex, projects it onto a flat 2D screen coordinate, and handles how virtual surfaces bend, deform, or wave in the wind.
These cores handle the mathematical transformations that position every vertex correctly in screen space relative to your virtual camera — determining what’s visible, what’s behind the camera, and how perspective distortion should be applied. If a triangle is completely hidden behind a wall, the GPU discards it immediately to save processing power.
Step 3: Rasterization — From 3D Triangles to 2D Pixels
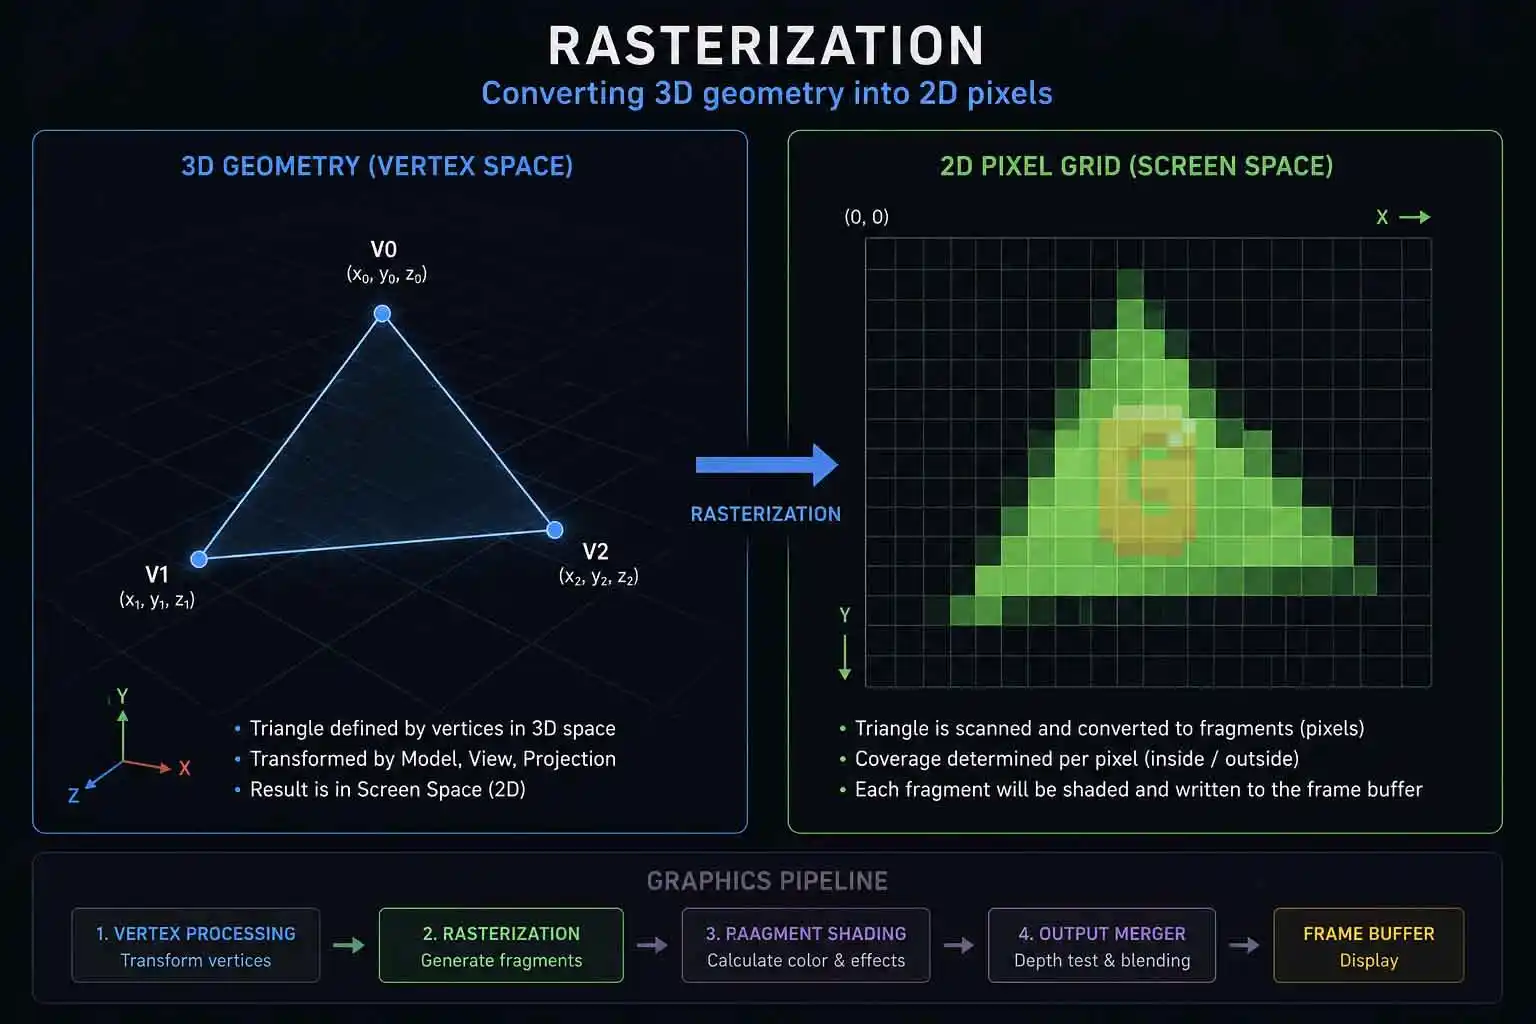
Rasterization is the process of converting vector-based 3D geometric shapes into a flat grid of 2D pixels that your monitor can physically display. It determines which specific pixels on your screen are covered by the virtual triangles that make up the game’s 3D models.
At this point in the pipeline, the GPU knows where the triangles are, but it does not know which physical screen pixels they occupy. This is where what is rasterization gaming comes into play. Rasterization is handled by fixed-function hardware units inside the GPU that project the 3D vector triangles onto a 2D grid of target pixels.
If a triangle covers the center of a pixel, the rasterizer flags that pixel for rendering. The output of this stage is a massive collection of “fragments”—which are candidate pixels that are ready to be colored.
Rasterization vs. Ray Tracing: The Core Difference
Modern GPUs can also trace individual light rays to calculate realistic lighting, reflections, and shadows — a technique called ray tracing. In most games, ray tracing is layered on top of rasterization rather than replacing it: rasterization still handles geometry, while ray tracing handles specific high-cost lighting calculations. Even so-called “full path tracing” modes in games like Cyberpunk 2077 still rely on rasterization for geometry setup. Dedicated RT cores on modern GPUs handle these ray calculations in parallel with the rasterization pipeline.
Step 4: Pixel Shading — Textures, Lighting, Shadows
Pixel shading is the stage where the GPU calculates the final color, lighting, texture, and shadow values for every individual pixel determined by the rasterizer. This is where parallel compute units process highly complex mathematical equations to simulate realistic materials, surface details, and light interactions.
This is the most computationally demanding stage of the entire pipeline. The GPU cores execute “pixel shader” programs that calculate exactly how light hits each surface. The numerical precision formats these calculations use — FP32, INT32, FP4 — are explained in our FP32, INT32, FP4, INT4 Explained article.
To make surfaces look realistic rather than flat, the GPU uses Texture Mapping Units (TMUs). TMUs pull texture images out of the VRAM, filter them to prevent blurriness at steep angles, and wrap them around the 3D shapes.
At the same time, shaders compute ambient occlusion, reflections, and direct lighting. The GPU calculates these equations thousands of times per pixel to generate realistic skin, metallic sheen, or watery surfaces.
Step 5: Post-Processing — Anti-Aliasing, Bloom, Motion Blur
Post-processing is a final rendering stage where visual filters are applied directly to the 2D frame buffer image after the 3D scene has already been drawn. It mimics optical effects like lens bloom, camera motion blur, and depth of field, while also cleaning up pixel edges through anti-aliasing techniques.
Once the main 3D scene is drawn, the GPU treats the frame as a flat 2D photograph. It passes this image through final filters to mimic real-world camera properties.
This stage includes calculating motion blur, depth of field, and bloom. It is also where the GPU cleans up jagged pixel edges. For a deep dive into how modern hardware smooths out these jagged lines, you can check out our guide on Anti-Aliasing Techniques Explained (TAA, SMAA, FXAA, DLAA).
Once all post-processing effects are finished, the final color values are sent to the Render Output Units (ROPs). The ROPs handle the physical act of writing the completed pixel values back into the VRAM’s back buffer.
Step 6: Display Controller & Signal Transmission
The display controller reads the completed frame from the front frame buffer and converts it into a digital signal that travels across a physical cable to your monitor. This controller continuously scans out pixel data line-by-line to ensure a steady stream of imagery reaches the screen.
While the GPU’s cores are already busy building the next frame in the back buffer, the Display Controller reads the finished image from the front buffer. It reads this data sequentially, row by row, from top-left to bottom-right.
The display controller translates this binary color data into high-speed digital signals. It packages the data into digital signal standards like HDMI 2.1 or DisplayPort 2.1. These signals are sent down your physical video cable as a stream of electrical signals. Older systems commonly use HDMI 2.0 or DisplayPort 1.4 instead, and the choice between them meaningfully affects what refresh rates and resolutions actually make it through — our HDMI 2.0 vs DisplayPort 1.4 comparison breaks down exactly where each one hits its ceiling.
Both of those standards can also lean on Display Stream Compression to carry more data than their raw bandwidth would normally allow — our breakdown of whether your GPU or cable supports DSC covers how that compression trick actually works.
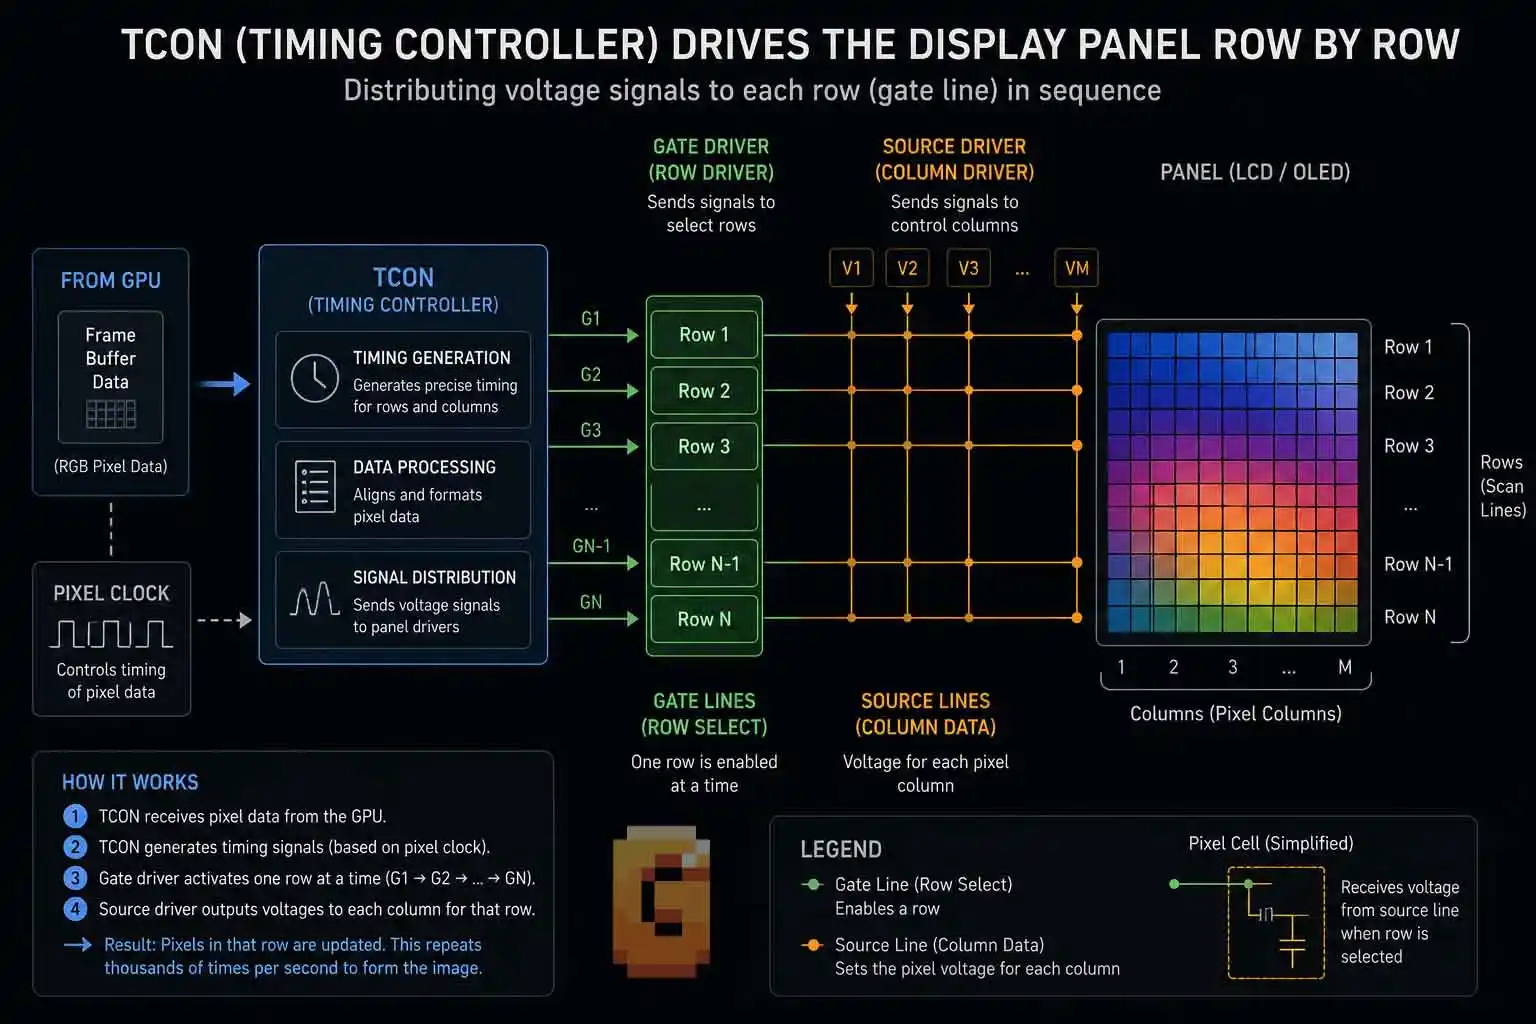
Once the signal reaches your monitor, an internal chip called the Timing Controller (TCON) decodes it. The TCON translates the data into physical voltage changes that adjust the orientation of liquid crystals or activate self-emitting subpixels. This final electrical change allows light to pass through the screen and hit your eyes.
What Your In-Game Graphics Settings Are Actually Controlling
Every in-game graphics option directly adjusts the workload of a specific hardware block in either your CPU or GPU rendering pipeline. By understanding this relationship, you can pinpoint exactly what physical hardware resource is bottlenecking your performance when adjusting your settings.
Instead of guessing what settings to change when your frame rate drops, you can map every option in your game’s menu directly to the pipeline stage we just discussed:
| In-Game Setting | Pipeline Stage Affected | Primary Hardware Component |
| Draw Distance / LOD | Geometry & Vertex Stage | CPU (Draw Calls) & GPU Vertex Shaders |
| Resolution Scale | Rasterization Stage | Rasterizer & VRAM Bandwidth |
| Texture Quality | Pixel Shading Stage | Texture Mapping Units (TMUs) & VRAM Capacity |
| Shadow Quality | Pixel Shading Stage | Shader Cores & VRAM Bandwidth |
| Anti-Aliasing (TAA/DLAA) | Post-Processing Stage | Shader Cores & Tensor Cores (AI) |
| V-Sync / G-Sync | Frame Buffer / Presentation | ROPs, VRAM, & Display Controller |
If your CPU is struggling, turning down your Draw Distance or Level of Detail (LOD) reduces the number of draw calls your CPU must generate.
If your GPU is the bottleneck, lowering your shadow resolution or texture quality relieves pressure on your shader cores and VRAM bandwidth. For gamers tracking performance variations over time, managing these settings is key to smoothing out frame delivery. You can learn more about how this impacts your gameplay in our breakdown of Average FPS, 1% Low & 0.1% Low Explained.
How Does the Hardware Keep Everything Synchronized?
Hardware synchronization prevents visual artifacts by matching the GPU’s rendering rate with the monitor’s refresh cycles through buffer coordination. Without this alignment, the display controller reads parts of multiple frames simultaneously, resulting in a visible horizontal split across your screen.
V-Sync vs. Variable Refresh Rate (VRR)
To solve this, developers historically used V-Sync, which forces the GPU to wait for the monitor’s physical refresh cycle before swapping the front and back buffers. However, if your GPU cannot render a frame in time, it misses the refresh window entirely, causing a sudden drop in frame rate.
Modern hardware solves this through G-Sync or FreeSync. These variable refresh technologies let your monitor adjust its refresh cycle on the fly to match the GPU’s frame delivery. To find out if your setup supports this hardware feature, read our guide on When to Enable G-Sync.
Which display mode you’re running also affects this handoff — our comparison of fullscreen vs windowed vs borderless windowed covers how Windows’ compositor gets involved differently depending on which one you choose.
Summary of the Rendering Pipeline
- The CPU handles input, updates the game state, and generates draw calls.
- The GPU Vertex Stage maps the 3D shapes into screen space.
- The Rasterizer turns those shapes into a flat grid of candidate pixels.
- The Shader Cores color the pixels using lighting, math, and textures.
- The Post-Processor cleans up edges and applies photographic filters.
- The Frame Buffer holds the final image in VRAM before display.
- The Display Controller transmits the pixel data to your monitor’s panel.
Frequently Asked Questions
Why does a CPU bottleneck lower my frame rate if my GPU is powerful?
Your GPU cannot render anything without instructions. The CPU must calculate physics, input, and AI, then package them into draw calls. If your CPU cannot generate these draw calls fast enough, your GPU sits idle waiting for work, regardless of its processing power.
What is the physical difference between rasterization and ray tracing?
Rasterization draws objects by projecting 3D vector shapes onto a flat 2D pixel grid. Ray tracing simulates individual light rays bouncing off surfaces in real-time. While rasterization uses fast, fixed-function hardware, ray tracing requires dedicated calculation cores to determine physical light paths.
How does VRAM capacity affect my frame rendering?
VRAM holds the textures, models, and frame buffers required for rendering. If your game settings require more VRAM than your GPU physically possesses, the system must swap data back and forth to slower system RAM over the PCIe bus, causing severe stuttering. We measured exactly this kind of gap in our RTX 5060 8GB vs RX 9060 XT 16GB comparison.
What is the role of a shader program in game performance?
Shader programs are mathematical instructions run by the GPU’s parallel cores to determine pixel appearance. They calculate surface textures, light reflection, and shadows. Highly complex shaders require more calculations per pixel, which is why intensive lighting settings heavily impact frame rates.
References
GamersNexus GPU rendering interview with NVIDIA’s Tom Petersen: https://gamersnexus.net/guides/2429-gpu-rendering-and-game-graphics-explained
Microsoft DirectX documentation on draw calls and command lists: https://learn.microsoft.com/en-us/windows/win32/direct3d12/recording-command-lists-and-bundles
Khronos Vulkan pipeline specifications: https://www.khronos.org/vulkan/
TechSpot 3D Game Rendering 101 series: https://www.techspot.com/article/1851-3d-game-rendering-explained/